Clarinet Bridge Key Issues
Words by Shawn Royer
What are Bridge Keys?
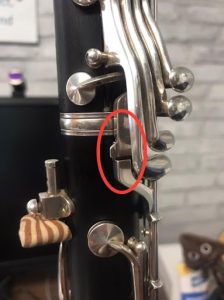
 Bridge keys are the connector-keys that connect one joint of an instrument to another. These specific keys can be found on clarinets, oboes, and bass clarinets. The bridge key mechanisms include both the bridge key connector, which rests against the instrument, and the bridge key, which rests on top of the connector.
When a key ring or key is depressed in one hand (right), the bridge key connector raises which then causes the bridge key to raise. When the bridge key raises, it causes a key in the other hand (left) to close.
Common Bridge Key Issues and Their Causes
Bridge key issues occur when the pad that the bridge key closes does not seal properly, creating a leak. Leaks most commonly occur when the bridge key is not aligned properly. Alignment issues can occur due to bent bridge keys or from not placing the bridge key in the exact optimal position on the bridge key connector for optimal seal. Leaks will also occur if the key-cork under the bridge key or under the bridge key connector falls off, wears down, or is otherwise the wrong thickness.
Things You Hear That Might Indicate a Bridge Key Issue
If someone’s bridge key is not aligned properly, you may not realize it until you notice specific issues. Those issues include:
- The one-and-one alternate fingering for low Eb/ high Bb does not respond or squeaks.
While this fingering (thumb with left hand first finger + right hand first finger) is not used very often because it sounds terribly sharp, it should still respond. If it does not respond at all, sounds super anemic, or just squeaks, this is a sure sign that there is a bridge key issue.
- The altissimo register including altissimo E and higher won’t respond or just sounds as squeaks.
This can indicate other issues as well, but when a student consistently has issues with altissimo E and higher, this most likely indicates an issue with the bridge key.
How to Check Your Bridge Key Alignment
Most people think that you can visually look for bridge key alignment. However, looking at the bridge key does NOT give an accurate indication of alignment. Not all bridge keys create the right seal when they are centered on the bridge connector! This is why it is vital that you follow these steps to ensure that your bridge key is set correctly.
*Before you put your instrument together, make sure that the tenon cork on your upper joint is well lubricated with cork grease to ensure that you can implement the small adjustments necessary to ensure correct alignment as described below.
- First, press down the key rings in the right hand (without pressing the left hand key rings).

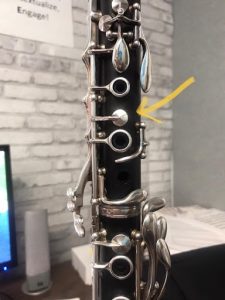
- Then, while holding the right hand key rings down, press and release the little key that sits between the left hand first and second key rings (see picture).
- When you tap this key, look at the bridge key. You should not see ANY movement from the bridge key.
- IF YOU SEE MOVEMENT IN THE BRIDGE KEY, press down the left-hand key rings and gently adjust the upper joint to the left (if you are looking at the key rings) so that the bridge key moves just a millimeter or so to the left on the bridge connector.
- Repeat steps 1-4 until you do not see movement in the bridge key.
- Next, press down all of the key rings in the left hand.
- Then, while pressing the left hand key rings down, repeatedly tap and release the right hand key rings with the same strength that you would normally use to play the instrument. You should not FEEL any movement under your left hand middle finger!
- IF YOU FEEL MOVEMENT (VIBRATIONS FROM YOUR TAPS) UNDER THE LEFT HAND MIDDLE FINGER, press down the left-hand key rings and gently adjust the upper join to the right (if you are looking at the key rings) so that the bridge key moves just a millimeter or so to the right on the bridge connector.
- Repeat steps 6-8 until you do not feel any movement under the left hand middle finger.
- Repeat all steps 1-9 until you find the *sweet spot*… meaning the spot where the bridge key sits on the bridge connector where you don’t see any movement in the bridge key while holding down the right hand key rings and tapping the little key between fingers 1 and 2 in the left hand, and where you don’t feel the vibrations from tapping down your right hand fingers while holding down the fingers of the left hand and tapping the right hand key rings.
This looks like many steps to check the alignment, but it takes longer to read the words than it does to actually complete the steps. It typically takes me about 10 seconds to check and adjust my bridge key alignment daily.
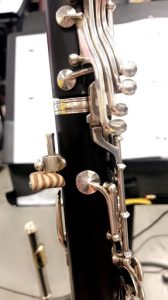
 *Note: If you have to pull out at the center tenon for tuning, recheck your alignment using the above steps and adjust as needed to ensure the seal is maintained. (See picture)
Following these steps can typically help you find the sweet spot for the seal, even if you are missing a key cork, your key cork is worn down, or if you have a bent bridge key.
How to Avoid Bending Bridge Keys
When I worked for Musician’s Repair & Sales in Indianapolis (back in the “olden days”), the owner, Rick Oldham, told me that the most common repair he typically had to do for clarinets was to fix bent bridge keys. Bridge keys can be bent to the left, right, downwards, or upwards. If the bend is minor, you can sometimes account for the bend by following the steps described above to adjust the alignment to make the key seal until you can get it to the repair shop. However, more severe bent keys, missing or worn key corks, and torn pads will require the attention of a repair technician before you can get a seal.
Bridge keys typically get bent when a student puts their instrument together without first raising their bridge key OR when they hit the left hand pinky keys with the bridge key while putting the instrument together. Bridge keys can also bend from dropping the upper joint. To put the instrument together without bending the bridge key, follow these steps.
- Press down all of the left hand key rings while firmly gripping the upper joint securely.
- Hold the lower joint by firmly gripping the lower half (on the rods below the pinky keys). DO NOT grip this joint over the key rings or else you will raise the bridge key connector! You do NOT want to raise the bridge key connector! Only raise the bridge key!
- While still pressing down all of the key rings on the upper joint, visually line up the bridge over the bridge key connector and slowly push the upper joint into the lower joint. You can wiggle the upper joint with tiny twisty motions ever so slightly as you push it into the lower joint if needed.
- Once the tenon is completely inserted into the lower joint and the bridge key appears to be lined up, then let go of the upper joint key rings.
- Finally, follow the above steps 1-10 to make the minor adjustments necessary to ensure proper alignment of the bridge key.
Clarinetist Shawn Royer (she/her) is an Assistant Professor of Music at Marian University, Yamaha Performing Artist, Vandoren Artist Clinician, and blog contributor for Classical Music Indy.


Leave a Reply