Clarinet & Saxophone Articulations Explained
Words by Shawn L. Royer, PhD
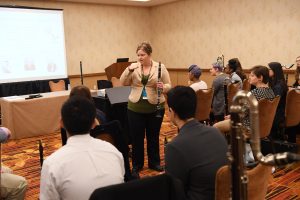
Articulating Correctly vs. Getting Really Good at Articulating Incorrectly
I once had a karate sensei that used to say, “Practice does not make perfect. Perfect practice makes perfect” (Sensei Sevenish, ~1994). I realized the truth of this statement during an early part of my musical studies when I had a clarinet teacher that told me that I was tonguing incorrectly. To supposedly remedy the problem, this teacher just gave me lots of etudes to play that required rapid articulations. Rather than fixing my incorrect approach to articulating, the practicing and performing of the etudes just helped me to get really good at tonguing incorrectly. The fundamental problem was still there, but I got better at masking it. However, as any clarinet player knows, it was only a matter of time before the need to articulate notes in the altissimo register exposed my persistent deficiencies. I quickly realized that articulating is a complex process that I would need to break down.
Tip-of-Tongue vs. Anchor-Tonguing
In addition to the clarinet teacher mentioned above, I also had an amazing clarinet teacher, Frank Glover, who told me to use the very tip of my tongue to articulate. I spent years after receiving his instructions figuring out how to articulate with the very tip of my tongue and how to break this process down and teach it to my students.
I have also had other musicians along the way challenge my approach, claiming that anchor-tonguing is the only correct way to articulate. In 2015, I administered an informal survey to several collegiate saxophone teachers to find out how they teach articulations. The results of this informal survey suggested that the majority of the professors I surveyed teach tip-of-tongue, while a few do not address the fundamentals of how to articulate unless a student clearly shows obvious deficiencies, while only one of the respondents taught anchor-tonguing as the primary way to articulate.
Also, I have observed that the clarinet is a much less forgiving instrument than the saxophone when it comes to articulations. For example, a saxophonist may sound just fine when they articulate, but when that same student picks up a clarinet, their tone, intonation, and response may all suffer if they are anchor-tonguing, especially in the higher registers. These issues are not as obvious when the student plays the saxophone. I believe that the biggest reason for these differences is due to the differences in tongue position between saxophone and clarinet.
I also want to recognize that students sometimes articulate in other, less common ways. For every ten clarinet or saxophone students that I work with, I typically encounter one student that is either using a “ka” or “ku” articulation (touching the roof of their mouth with the back of their tongue, as one might do when double-tonguing), or an “uh” articulation (opening and closing the throat to create the impression of articulating). I also once had a student that articulated by touching the front of the tongue to their bottom lip. All of these approaches led to issues with tone, response, intonation, and clarity in the upper clarion and altissimo ranges.
Tongue Positions and Articulations
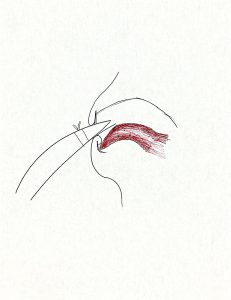
Figure 1. Anchor-tonguing
When a saxophonist plays, their tongue tends to sit pretty high in their mouth. I would describe this more of an “ee” vowel position. This tongue position is similar to the position that a clarinetist’s tongue sits while playing in the lower chalumeau register. Someone shaping an “ee” tongue position can very easily anchor the front of their tongue behind their bottom teeth to anchor-tongue with the middle/front part of their tongue on the reed. Likewise, someone who naturally anchor-tongues (which is extremely common in beginners), will probably naturally form an “ee” tongue position with the middle/back of their tongue. I believe that this is the reason that issues with tone and intonation are not typically exposed in anchor-tonguing clarinetists until they enter the clarion and altissimo registers (which require a different tongue position), and why saxophonists typically do not have the same issues with tone and intonation as clarinetists. See my amazing artwork above for clarification. The red thing in Figure 1 is a tongue anchored behind the front lower teeth. Notice the shape of the “ee” tongue position as formed by the middle/back of the tongue.
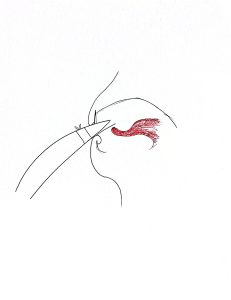
Figure 2. Tip-of-tongue
When the reed player uses only the very pointed tip of the tongue to articulate, however, the whole tongue changes position. Rather than the tongue setting in its forward-most position, the tongue retracts back a bit to allow control of the tip. There seems to be a fulcrum of sorts between the middle and front of the tongue, allowing the instrumentalist to control both the vowel shape of the back of the tongue (“ee” vs “oh”) and the nuance of touch with the front of the tongue (which part and how much of the tongue touches the reed, which part of the reed is touched, how hard is the reed touched/pressed). The development of this kind of control allows the musician to impact their timbre and intonation because thinking and gently shaping “oh” in the upper clarion and altissimo registers provides a necessary covered-ness and focus to the timbre and intonation. Controlling the tip of the tongue allows the student to move quickly and touch the reed lightly, and the same technique that creates legato articulations is used for staccato. I tell my students to focus on using only the one cell at the very tip of their tongues to touch the reed just below the tip of the reed. Figure 2 above shows the “oh” tongue position when using the tip-of-tongue technique. Notice the difference in tongue positions between figures 1 and 2.
Breaking Down the Articulation Process
To teach students how to articulate, I developed an exercise called the “Bumblebee Exercise.” I call it this because when I hear a room full of clarinetists or saxophonists doing the activity together, it sounds like a swarm of bees. To access my handout for this activity, visit www.shawnroyerjazz.com/clarinet and scroll to the resource entitled “Bumblebee Exercise.”
Basically, the activity has the student feel the very tip of their tongue by first pointing their tongue, then touching the one cell at the tip with their finger, then touching that same cell to their reed outside of and then inside of their mouth to feel what that feels like. Then, the students are asked to play an open note without articulating (“haaaaaa”). Then, while they are blowing a steady and strong stream of air, they should lightly touch the reed with the tip of their tongue and hold the tongue on the reed. If they do the activity correctly, they should hear a muffled sound while the reed is still vibrating and the air is still flowing, but the light pointed tongue is muffling the reed’s vibrations. Also, their tongue will tickle, and it may feel like they need to scratch their tongue with their teeth. Then, they should gently remove their tongue while continuing to blow air. They should do this process over and over, stopping only to breath when they need to, and never stopping the air. If we could put a video camera inside of someone’s mouth while they are articulating correctly, then watch that video in slow motion, this is what the articulations would look like.
As the student gets good at controlling their tongue during this exercise without response issues, then they should move up the register of the instrument in fourths or fifths until they can perform this activity in the altissimo register. Once they understand what it feels like to touch the reed lightly with only the tip of the tongue and what part of the reed to touch, then they are ready to go on to the articulation exercises prescribed in Daniel Bonade’s “Clarinetist’s Compendium” in chapter 3, Method of Staccato, published by Conn-Selmer, Inc.
The biggest difference that I have discovered between legato and staccato articulations is that staccato articulations require the student to depress the reed with enough pressure to completely stop the sound and still without stopping the air. So, while the bumble-bee exercise enables the reed to continue to vibrate throughout the activity and produce a muffled sound, the sound stops between each note during repeated staccato notes even though the air never stops flowing because the tongue is depressing the reed with enough pressure to close it off. For this reason, if a person performs staccato notes slowly, air may escape from the corners of their mouth between notes because there is nowhere else for the air to go. This is normal and perfectly fine.
Clarity and Closure
I once taught at a school with someone that insisted that their students should be “lifting the air” in between each staccato articulation. This same person became incredibly frustrated that their students could not articulate staccatos at fast tempos. For three years, they kept trying their same failed approach with the same disappointing results. I tried to explain that the tongue should control the staccato – not the air – and that the air should continue throughout the musical phrase, just as if they were playing a long whole note. However, there was nothing I could say or do to convince this seasoned educator that they should try a different approach.
Articulations on reed instruments are one of the great mysteries in the music world. On string instruments, we can see exactly how a student is articulating, but in the reed world, we can only speculate based on what we hear about what is truly happening inside a student’s mouth. I recognize that sometimes my approaches to understanding and teaching may seem unorthodox or just different from how other people teach. I also recognize that my drawings are terrible! However, it is my goal to simply provide my own experiences and perspectives in hopes that this information may be helpful to educators that are open to trying new approaches.
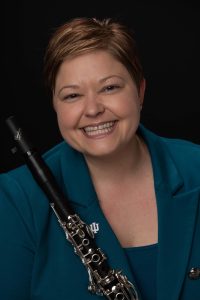
Dr. Shawn Royer (she/her) is an Assistant Professor and Chair of the Music Department at Marian University in Indianapolis. She plays clarinet and saxophone professionally as a Yamaha Performing Artist and Vandoren Artist Clinician.
Facebook: @SR4JazzClarinet



Leave a Reply